Sunday, November 9, 2014

Playing with Nigella's Banana, Cherry and White Chocolate Cupcakes Recipe!


It must be one of my missions in life to never throw away over ripened bananas!  I was lucky enough to find a recipe that called for 3 ripe bananas and decided this was the one to use.  Only problem was that it called for cherries and white chocolate and I had neither one!   Not that I would be deterred from trying this new banana cupcake recipe.  I just substituted frozen raspberries and milk chocolate chips.  they were delicious too!

I own the UK version of Nigella's "How to be a Domestic Goddess"  but looked up the American version on the internet to see if I could use both versions simultaneously to help me do this as fast as possible.  Using cups is much easier and faster, but I do believe using measurements gives more consistent results.  One roadblock though, how to weigh frozen raspberries?  I am not sure, but I would guess frozen berries weigh more, but a quarter cup is just a simple quarter cup!  

One thing I have learned to be very helpful since starting this blog is the advantage of having all the necessary ingredients together before starting.  Many times before I started doing that, I would be in a mad panic in the middle of a recipe, at a crucial moment and unable to find an essential ingredient.   This no longer happens, but on occasion, something worse happens as a result of all those little bowls of ingredients ready and waiting for me.  Those little bowls can move, seemingly on their own......

Being unfamiliar with this recipe, I did think the batter was really runny when I put them in the cupcake liners and into the oven to bake.  Thankfully, I began to clean the kitchen right away which is not my usual practice!  And lurking behind the kettle was one cup of plain flour just sitting there waiting to become part of the batter......I whipped those cupcakes out of the oven and contemplated just throwing it all away.  But instead, I took each and every soggy cupcake out of the pan and dumped the batter into a bowl.  I wish I had thought to take a photo of the mess of those liners dripping on the saucer after I managed to salvage the process.  Who knew those cupcakes would survive and come out tasting wonderful, even after such a stupid and careless mistake!


Not to reinvent the wheel, I am sharing the recipe I found on the internet with both measurements!   Many thanks to dinnerdujour.org for doing all the work!    The few notes I added are in purple.  Recipe on its own follows at the end.

Banana, Cherry and White Chocolate Cupcakes
adapted by dinnerdujour.org from How to Be a Domestic Goddess by Nigella Lawson
Makes 12 cupcakes
See the bowl just under the butter?  That is the one I missed!
1/2 cup + 1 tablespoon (125 g) unsalted butter
1 cup (200 g) sugar
1 teaspoon vanilla extract
3 ripe bananas, mashed
1/4 cup (60 ml) sour cream or natural yogurt
2 large eggs, beaten
2 1/2 cups (300 g) plain flour
1 teaspoon baking soda
1/2 teaspoon baking powder
1/3 cup (40 g) dried cherries, chopped (you could substitute dried cranberries or even raisins)  I substituted frozen raspberries
1/4 cup (50 g) white chocolate, chopped, or use chips or buttons  - milk or dark chocolate works too!
Preheat the oven to 350°F (180°C). Line a muffin tin with paper or silicone cases.
Melt the butter in a saucepan big enough to eventually hold all the batter. Off the heat, add the sugar, vanilla and mashed bananas. Stir in the sour cream or yogurt and the eggs and beat to mix with a wooden spoon. Sift in the flour, baking soda and baking powder, then fold in the cherries and chocolate. Mix until everything is just blended (don’t overmix!), then divide the mixture between the 12 muffin cases. Cook for 20 minutes, until golden and springy on top and a tester comes out clean. Remove the cupcakes in their papers to a wire rack and leave till cool.
"Laughing at our mistakes can lengthen our own life.  Laughing at someone else's can shorten it."  Cullen Hightower

Banana, Cherry and White Chocolate Cupcakes
adapted by dinnerdujour.org from How to Be a Domestic Goddess by Nigella Lawson
Makes 12 cupcakes
1/2 cup + 1 tablespoon (125 g) unsalted butter
1 cup (200 g) sugar
1 teaspoon vanilla extract
3 ripe bananas, mashed
1/4 cup (60 ml) sour cream or natural yogurt
2 large eggs, beaten
2 1/2 cups (300 g) plain flour
1 teaspoon baking soda
1/2 teaspoon baking powder
1/3 cup (40 g) dried cherries, chopped (you could substitute dried cranberries or even raisins)
1/4 cup (50 g) white chocolate, chopped, or use chips or buttons
Preheat the oven to 350°F (180°C). Line a muffin tin with paper or silicone cases.
Melt the butter in a saucepan big enough to eventually hold all the batter. Off the heat, add the sugar, vanilla and mashed bananas. Stir in the sour cream or yogurt and the eggs and beat to mix with a wooden spoon. Sift in the flour, baking soda and baking powder, then fold in the cherries and chocolate. Mix until everything is just blended (don’t overmix!), then divide the mixture between the 12 muffin cases. Cook for 20 minutes, until golden and springy on top and a tester comes out clean. Remove the cupcakes in their papers to a wire rack and leave till cool.


Saturday, November 8, 2014

Chocolate Chip Bars for our trip to London!

I must admit, I love baking and will jump at any excuse to do this!  One of the best is when I know our son will be the beneficiary of my efforts!  A few weeks before our trip to London to see him, our daughter, grandson and niece took a bus, fully loaded with banana muffins and a new cookie I had not baked before.  Here is the link to the blog I am keeping about Morgan's stay with us and how that weekend went.I am not going to publish the recipe for that cookie yet, because it just might be the one I do for this year's Christmas Cookie Swap!

On this journey, we made the difficult decision to fly Ryanair from Glasgow to Stanstead Airport just outside of London.  When I say just outside London, it is almost a 2hours trip by bus to get into central London.  Not a fun journey at all. And this flight used to leave from Prestwick, which is only a 15 minute drive from our house.  To leave on the first flight from Glasgow, we had to get a hotel room near the airport.  Not nice when we have been so spoiled in the past.

There were two reasons for this trip, the first and most important was to see Martin, but we also wanted to see the Tower of London poppies.  Since Martin had seen this 2 weeks earlier with his sister and everyone, he really did not want to face the crowd of visitors once again!  So we went straight to the Tower before meeting him at St Paul's Cathedral later that afternoon.

The sight of all those poppies is breathtaking, and very much worth a visit, even if having to fight the crowds.  In fact, it was much too crowded to see it all properly, especially with also wanting to find Martin sooner rather than later.  In addition, the traffic congestion and maintenance work on the tube lines we needed made transport incredibly difficult and time consuming too!   But worth all this!

a close up so you can see the way the individual poppies are placed

Could not get a decent angle on this iconic view of the window


How lucky were we with the weather?


Whenever we are in London, we tend to walk and walk and walk and walk......here I am on the riverfront with the Tower Bridge behind me on the way to meet Martin.  When flying Ryanair, you have to pay extra for a case, so all my worldly goods, including cookies, are in my trusty, pink backpack!


Once we found Martin, we spent some time around Westminster to catch the evening light.

We were having a great time and took the train back to Chiswick, where our hotel was.  Then we got a phone call that almost ruined the whole trip.....our poor Bailey had not been well when we left, but the vet thought she would be ok until Monday. Unfortunately he was wrong.  Morgan phoned us to let us know, we phoned the vet's assistant, she phoned the vet, he phoned us, he then phoned Morgan.....then he went to our house to collect Bailey.  Late Saturday night she got an emergency hysterectomy and was brought home at 1:30am Sunday.

Somehow, once we knew things were under control, we managed to salvage the night and went to the George IV Comedy Club.  It seemed odd to be sitting there laughing after only about an hour ago we were contemplating Martin taking the night bus home to take care of his ailing dog!  I am writing this exactly one week after her surgery and Bailey is doing just fine!  I will always be grateful to our fabulous vet and my superstar niece for handling this stressful situation so well.

Look how busy it is here!  Corbyn would love to see this dinosaur skeleton!


On Sunday, after meeting for a delicious breakfast and getting absolutely soaked in the rain we decided to go to the Natural History Museum to see the Wildlife Photographer of the Year exhibition. But we never thought to book tickets and there were none available for the time we needed.  Oh well, still a great place to visit!


It wasn't until Sunday morning that I was able to deliver these cookies, and they had survived all the hours and miles of this trip.

I have this recipe hand written in a little cookbook I received as a gift years ago.  I do not remember what I copied it from, but my notes show that the first time I tried it was in January 2001.

There are conversion charts on my "pages" to find equivalent butter weights and pan sizes.

Championship Chocolate Bars   (recipe on its own follows at the end)    
 

Preheat oven to 350F   180C       makes about 36 bars


1/12 cups flour
1/2 cups light brown sugar
1/2 cup (1 stick) cold butter
2 cups chocolate chips
1 can (14 oz) sweetened condensed milk
1 egg, slightly beaten
1 tsp vanilla
1 cup chopped nuts (optional)


Stir together flour and sugar, cut in cold butter
Stir in 1/2 cup chocolate chips
Press into the bottom of 13 x 9 inch pan.
Bake 15 minutes.
While baking, combine milk, egg and vanilla
Add remaining chocolate chips and nuts
Spread mixture evenly over baked crust
Bake 25 minutes or until golden brown
Cool completely before cutting into bars.

I had 4 of these boxes in my backpack all day!


"Everyone has a story, but no one would make it to the happy ending if they didn't have the help of the other characters."  Levita Charin


Championship Chocolate Bars      

Preheat oven to 350F   180C     makes about 36 bars

1/12 cups flour
1/2 cups light brown sugar
1/2 cup (1 stick) cold butter
2 cups chocolate chips
1 can (14 oz) sweetened condensed milk
1 egg, slightly beaten
1 tsp vanilla
1 cup chopped nuts (optional)

Stir together flour and sugar, cut in cold butter
Stir in 1/2 cup chocolate chips
Press into the bottom of 13 x 9 inch pan.
Bake 15 minutes.
While baking, combine milk, egg and vanilla
Add remaining chocolate chips and nuts
Spread mixture evenly over baked crust
Bake 25 minutes or until golden brown
Cool completely before cutting into bars.


Tuesday, October 21, 2014

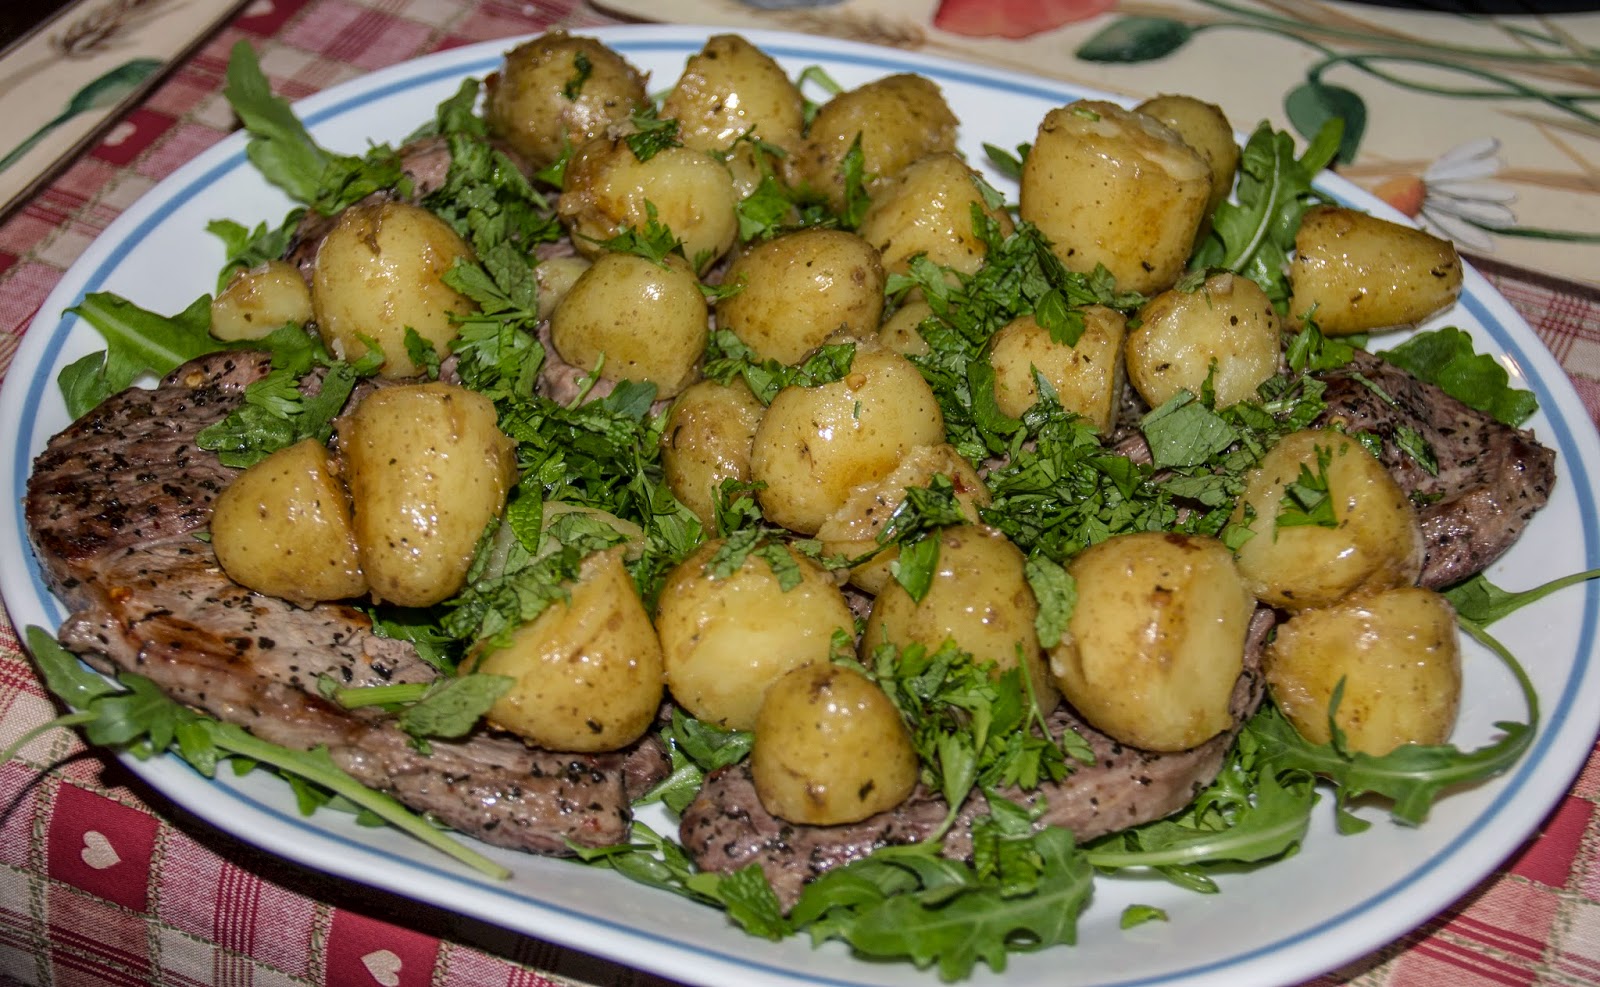
Nigella's Lamb Cutlets with Mint and Golden Potatoes

This recipe is simple, easy and delicious!  


I was just looking for something different and this recipe caught my eye - to be honest, it just looked pretty!  So I decided to try it.  Now I believe it will be a family staple.  

A few years ago I was at a food market and purchased some gorgeous garlic oil from a stall holder. At the time, my daughter had just discovered her love of cooking, thanks to Nigella's tv program about her latest cookbook at the time - Nigella Express.   I explained this to the stall holder and said I had a lot to thank Nigella for, she agreed that we all have a lot to thank Nigella for!  

I have simply copied this recipe because it would be a shame to mess with perfection!  Ok, I stuck some photos in but if you want just the plain recipe, look a bit further and it will be there!  


Nigella's Lamb Cutlets with Mint and Golden Potatoes


I forgot to put the Rocket in this group!


Ingredients
  • 1 lb baby white potatoes, halved but not peeled
  • 3 tbsp extra-virgin olive oil
  • ½ tsp crushed red pepper flakes
  • 1 tsp dried mint
  • ½ tsp celery salt
  • 8 lamb chops
  • 4 cups packed rocket, to serve (optional)
  • 1 tsp kosher salt or ½ tsp table salt, or to taste
  • 1 tbsp chopped fresh parsley
  • 1 tbsp chopped fresh mint


Directions
1 Put the baby potatoes on to steam.

2 Get out a large dish – in which the lamb chops will fit in a single layer – and first pour into it the olive oil and sprinkle in the red pepper flakes, dried mint and celery salt. 

3 Using 1 lamb chop as if it were a wooden spoon, smoosh the oil with its sprinklings around a bit, so that it’s rather better mixed, then place the lamb chops in a single layer, turn them instantly, and leave to marinate for 10 minutes.

4 Heat a large, heavy, non-stick frying pan – big enough (about 11 inches in diameter) for all the chops to fit in – then duly place them all in it (the oil that clings to them from the marinade is plenty enough for them to fry in) and fry over medium heat for 5 minutes. 

5 While the chops cook, check that the potatoes are tender, which they should be by now; in which case, turn the heat off under your steamer, pour off the water, and let the potatoes stand, drying, while they wait.

6 Using tongs (for ease), turn the chops over and cook for a further 3 minutes. 

7 If you’re going to make this an entire one-plate meal, strew the bottom of a large serving platter with fresh rocket, or any other leafage you desire, and when the lamb chops are cooked, but still juicily pink on the inside, remove them to the salad-lined (or, indeed, naked) plate. Obviously, cook for longer if you like your lamb well done.

8 Tip the steamed potatoes into the same pan and fry for 3 minutes, then turn them over and fry for another 3 minutes, shaking the pan every now and again to make them tumble and turn in the hot fat.

9 Using a slotted spatula or similar, transfer the potatoes to the plate of chops and sprinkle with 1 teaspoon of kosher salt (I like these plenty salty, but if you have more austere tastes or are feeding small children, then decrease the salt or ignore the command altogether) along with the chopped parsley and mint.

Prep and cook time: 40 minutes.
Serves 4.

"I don't believe in low-fat cooking."   Nigella Lawson


Nigella's Lamb Cutlets with Mint and Golden Potatoes


Ingredients
  • 1 lb baby white potatoes, halved but not peeled
  • 3 tbsp extra-virgin olive oil
  • ½ tsp crushed red pepper flakes
  • 1 tsp dried mint
  • ½ tsp celery salt
  • lamb rib chops 
  • 4 cups packed rocket, to serve (optional)
  • 1 tsp kosher salt or ½ tsp table salt, or to taste
  • 1 tbsp chopped fresh parsley
  • 1 tbsp chopped fresh mint

Directions
1 Put the baby potatoes on to steam.

2 Get out a large dish – in which the lamb chops will fit in a single layer – and first pour into it the olive oil and sprinkle in the red pepper flakes, dried mint and celery salt. 

3 Using 1 lamb chop as if it were a wooden spoon, smoosh the oil with its sprinklings around a bit, so that it’s rather better mixed, then place the lamb chops in a single layer, turn them instantly, and leave to marinate for 10 minutes.

4 Heat a large, heavy, non-stick frying pan – big enough (about 11 inches in diameter) for all the chops to fit in – then duly place them all in it (the oil that clings to them from the marinade is plenty enough for them to fry in) and fry over medium heat for 5 minutes. 

5 While the chops cook, check that the potatoes are tender, which they should be by now; in which case, turn the heat off under your steamer, pour off the water, and let the potatoes stand, drying, while they wait.

6 Using tongs (for ease), turn the chops over and cook for a further 3 minutes. 

7 If you’re going to make this an entire one-plate meal, strew the bottom of a large serving platter with fresh rocket, or any other leafage you desire, and when the lamb chops are cooked, but still juicily pink on the inside, remove them to the salad-lined (or, indeed, naked) plate. Obviously, cook for longer if you like your lamb well done.

8 Tip the steamed potatoes into the same pan and fry for 3 minutes, then turn them over and fry for another 3 minutes, shaking the pan every now and again to make them tumble and turn in the hot fat.

9 Using a slotted spatula or similar, transfer the potatoes to the plate of chops and sprinkle with 1 teaspoon of kosher salt (I like these plenty salty, but if you have more austere tastes or are feeding small children, then decrease the salt or ignore the command altogether) along with the chopped parsley and mint.

Prep and cook time: 40 minutes.
Serves 4.

Wednesday, October 1, 2014

Experimenting with Turnip, Honey & Roasted Garlic Soup

We had committed to our daughter that we would help spruce up our daughter's new home by helping her paint and all that general stuff you do in a new home....However, Alan did not remember that he actually agreed to a particular day, and this was his only day off that week....oh well, as good parents, we decided she needed us more than he needed to relax! Or whatever he does on a day off!

Since Alan was working in the morning, I volunteered to make lunch and we all would arrive in separate cars with separate chores expected of us.

Coincidentally, I discovered smoked garlic at Morrison's, that was not overpriced! The only other place I had seen this was in an international food market and could not justify what they were asking. Then, at the checkout, they could not find smoked garlic and charged me the normal price!  How lucky was that?  So did I run back and get more?  No....but I do hope to get some more soon!

Since I have the soup maker, I decided to find a recipe in the New Covent Garden "A Soup for Every Day" cookbook and came across this recipe for September 19th.   But I also know my daughter shares the same love of sweet potatoes I do, so for the first attempt, I used sweet potatoes instead of regular ones.  It was really, really good!  I used this same recipe a few days later for my in-laws, but kept with the regular potatoes and skipped the garlic.  The main reason for skipping the garlic is that my mother-in-law is diabetic and I believe the honey is to complement the garlic. So best not to use either instead of overpowering the soup with garlic!  In the end, this version was also very good.

As always, the recipe will follow at the end as written in the book, with no photos or comments.

Turnip, Honey and Roasted Garlic Soup

Serves 4
Cooking time 1 hour and 20 minutes 

Ingredients:

25g butter
1 medium onion, finely diced
3 medium carrots, diced
2 medium potatoes, Sweet or white, diced
300g turnips, diced
1 stick celery, sliced
750ml chicken stock
6 cloves garlic, roasted in skin until soft
4 teaspoons honey

1.  Melt butter in a saucepan, add the onion, then cover and cook gently for 10 minutes, without browning.   

  ---with the soup maker, I put a tablespoon of olive oil at the bottom and added the onions, and all other vegetables.

2.  Add the carrots, potatoes, turnips, celery and stock to the pan.  Bring to the boil, cover, then simmer gently for 1 hour, stirring occasionally. 

---the soup maker is supposed to have at least 600ml of stock and that was about all I could squeeze in!   Then all I did was turn it on to chunky and it was done in about 25 minutes!


3.  Remove from the heat, blend half the soup until smooth, then return it to the pan.

4.  Squeeze the roasted garlic cloves from their skins, mash to a paste, then add to the soup along with the honey.  Season to taste, then reheat gently for 2 - 3 minutes and serve.


---I just put the garlic segments in a bit of tin foil and roasted in the oven while the soup was cooking.  But squeezing them is a lot harder than it sounds.  I kept getting a bit of roasted skin in.  Next time, I will try to remove more skin before roasting!


"Dreams about the future are always filled with gadgets."

Turnip, Honey and Roasted Garlic Soup

Serves 4
Cooking time 1 hour and 20 minutes 

Ingredients:

25g butter
1 medium onion, finely diced
3 medium carrots, diced
2 medium potatoes, diced
300g turnips, diced
1 stick celery, sliced
750ml chicken stock
6 cloves garlic, roasted in skin until soft
4 teaspoons honey

1.  Melt butter in a suacepan, add the onion, then cover and cook gently for 10 minutes, without browning.

2.  Add the carrots, potatoes, turnips, celery and stock to the pan.  Bring to the boil, cover, then simmer gently for 1 hour, stirring occasionally. 

3.  Remove from the heat, blend half the soup until smooth, then return it to the pan.

4.  Squeeze the roasted garlic cloves from their skins, mash to a paste, then add to the soup along with the honey.  Season to taste, then reheat gently for 2 - 3 minutes and serve.


Saturday, September 27, 2014

Just a Simple Chocolate Cake


One of the many pleasures I have is living so close to my daughter and grandson.  This might mean I babysit more than many grandparents, but most of the time, we have fun.  (He is 5 years old, so we can't have fun all the time, that just would not be normal!)

One of the bonds we have though, is the love of baking.  But our focus is not the same.  I enjoy the challenge and the fun involved, Corbyn likes the end product and would skip all the process of measuring and waiting if that were possible!

My original idea of working through "My Baking Journal" in a systematic matter is not compatible with Corbyn's approach....so we are repeating a cake that he wanted to bake for his Mum. He knows she enjoyed this cake and I am surprised we had not added it into this blog already.

I have the idea that this is also one of Corbyn's favourite recipes since he had to rate the result out of ten and gave it 135 plus 1 million/10.    Since he is only 5 years old, I will not worry about his lack of grasp of fractions (yet)!


Nutella is not part of this cake, but Corbyn liked the idea that it was here!


Corbyn is very aware of food hygiene, or rather, he really likes the idea of wearing aprons! So when my niece, Morgan, offered to help, he insisted she also wear an apron!


As always, an unadorned recipe with no comments or photos will follow at the end.


Simple Chocolate Cake

Ingredients:
There is a hint of something I did wrong here.....answer at the end!

170g butter
170g caster sugar
140g self-raising flour
1 tsp baking powder
85g drinking chocolate
3 large eggs
3 Tbs boiling water

(Corbyn decided to add about 1/4 cup white chocolate chips and this was really a nice touch!)

Instructions:

1.  Grease or line an 18cm (9 inch) square cake tin and preheat oven to 180C, 350F

2.  Cream together the sugar and butter until light and fluffy.

3.  Beat in the eggs, and then add the boiling water.

4.  Sift in the flour, baking powder, and drinking chocolate.  Mix well.  Add chocolate chips if using.

5.  Transfer mixture to tin and bake for 25-30 minutes until well risen.  The cake will be ready when you insert a knife and it comes out clean with no mixture sticking.

6.  if you intend to ice this cake, do this after the cake has cooled completely.  Both times we have made this, we have not iced it.  The cake is just delicious enough without icing!


After we went through all the steps and put the cake in the oven, I had a look at the tin containing flour.....and it dawned on me, this was Plain Flour, not Self Raising Flour......!   Too late to do anything but hope.  At least we put in the baking powder and this seemed to be enough.  The cake was delicious, even made wrong.  How lucky for all of us!


"I want someone to look at me, the way that I look at chocolate cake."  
Unknown quote


Simple Chocolate Cake

Ingredients:

170g butter
170g caster sugar
140g self-raising flour
1 tsp baking powder
85g drinking chocolate
3 large eggs
3 Tbs boiling water

(Corbyn decided to add about 1/4 cup white chocolate chips and this was really a nice touch!)


Instructions:

1.  Grease or line an 18cm (9 inch) square cake tin and preheat oven to 180C, 350F

2.  Cream together the sugar and butter until light and fluffy.

3.  Beat in the eggs, and then add the boiling water.

4.  Sift in the flour, baking powder, and drinking chocolate.  Mix well.  Add chocolate chips if using.

5.  Transfer mixture to tin and bake for 25-30 minutes until well risen.  The cake will be ready when you insert a knife and it comes out clean with no mixture sticking.

6.  if you intend to ice this cake, do this after the cake has cooled completely.  Both times we have made this, we have not iced it.  The cake is just delicious enough without icing!


Wednesday, September 17, 2014

Welcoming Beef Stew


After months, maybe even a year, of talking about it, my niece, ok grand-niece but that is too detailed, arrived to spend 6 months with us!  Her daddy loves to travel and they both jumped at the chance for her to come here after graduating from high school to experience "Europe" before beginning the next chapter of her life - university!


The idea of this young person doing us the honour of voluntarily staying with us and giving up 6 months of her life for uncharted territory is quite daunting!  Alan and I are inspired to travel like we used to, even though Ryanair is not cooperating and has changed the flights leaving from our local airport and taken loads of destinations away.  We are working through this and enjoying the challenge! And, you know what?  We are also very happy to have a young person in the house again!

She travelled with my sister and brother-in-law, beginning their journey in the Republic of Ireland, landing in Dublin and taking in Waterford before taking a ferry to Heswell.  In Heswell, they have cousins that her daddy and grandfather had met the last time they were over here, 2002.  I cannot believe it was that long ago!  From there, they drove up to Scotland.  This is a gargantuan journey for someone who had never driven on the "wrong side of the road' all his life.  I know I could not have done it!

I know when I travel, I never eat right and feel awful after a few days, so I felt a bit responsible to find something warm and welcoming. What is better than good old fashioned Beef Stew?


One of the reasons I decided on this recipe was because they were coming from Florida and we should have had Autumn weather by now and I was afraid they would be chilly!  Little did I know the weather was going to be as good or better than a regular summer day?  Not complaining at all and the beef stew was still perfect!


Anyone who regularly reads my blog knows I love the Joy of Cooking and own 3 different editions. The edition I chose for today's recipe was the one Mom gave me in 2002.  But I did change it a bit, instead of making stew in a pot the way I have always made it, I used my slow cooker.  Not only was this so much easier, but the process made the meat really tender!

And on another note, my blog is now 2 years old and I have received almost no comments the whole time.  This has upset me so much when I read other blogs and see all the comments.  I even considered changing my providers......but after a bit of advice from another blogger I started investigating all the settings within Blogger, and lo and behold, I had somehow ticked a box that did not permit comments being left!  I hope I have fixed that and look forward to having more of a dialogue with my readers!

As always, the basic recipe, with no comments or photos can be found at the bottom of this entry.

Beef Stew (Basic Recipe)

6 - 8 servings

The Joy of Cooking introduces this recipe by saying that you can alter the vegetables and proportions.  For a fresher flavour, add more vegetables or herbs toward the end of cooking.

Pat dry:
2 pounds boneless stewing beef, such as chuck, short-rib meat or bottom round, cut into 2 inch cubes.  Or go to the store and buy stewing beef!  Already cut up and ready to throw in the pot!

To save time and give me more leeway since I had no idea when my visitors would arrive, I used the slow cooker!  And will do this all the time now. It worked really well!


Line the slow cooker with a liner and add the meat.  Season the meet with:
1/2 to 1 teaspoon dried herbs (thyme, marjoram, savory, oregano, and/or basil)  (I used Italian seasoning)
1/2 teaspoon salt
1/2 teaspoon ground black pepper

Dredge the meat with:
1/2 cup all purpose flour
(an easy way to do this is to add the flour to the mixture already in the slow cooker liner and shake the meat until all pieces are covered with flour, then put it all back into the slow cooker!)

Shake off any excess flour.  Heat over medium-high heat:
2 Tablespoons olive or vegetable oil, bacon fat, beef drippings, or other fat

Add the meat in batches and brown on all sides, being careful not to crowd the pan or scorch the meat.  Remove with a slotted spoon.  Pour off all but 2 tablespoons of fat from the pan (add more if needed.)  Add:

1/2 cup chopped onion
1/4 cup chopped carrots
1/4 cup chopped celery
1/4 cup chopped leeks (optional)
2 tablespoons chopped garlic (optional)

Cover and cook, stirring often, over medium heat until the onions are softened, about 5 minutes.  Add:
2 bay leaves
1/2 to 1 teaspoon of the same herbs used to season the meat
1/2 teaspoon salt
1/2 teaspoon ground black pepper

At this point, I put all ingredients, including the stock into the slow cooker on low and planned to cook this for 8 - 9 hours.

Add enough to cover the meat at least halfway:
2 to 3 cups beef or chicken stock, dry red or white win, or beer.

If you use the slow cooker, you don't have to bring everything to a boil!

Bring to a boil.  Reduce the heat, cover, and simmer over low heat until the meat is fork-tender, 1 1/2 to 2 hours.  Add:
2 to 3 carrots, peeled and cut into 1-inch chunks
3 or 4 boiling potatoes, peeled and cut into 1-inch chunks
2 turnips, peeled and cut into 1-inch chunks
2 parsnips, peeled and cut into 1-inch chunks

I added all these vegetables after about 4 hours of cooking the original meat mixture.

Cover and cook until the vegetables are tender, 35 to 40 minutes.  Remove the pan from the heat and skim off any fat from the surface.  Taste and adjust the seasonings.
Yum!


"There is a charm in making a stew, to the unaccustomed cook, from the excitement of wondering what the result will be, and whether any flavour save that of onions will survive the competition in the mixture."
Annie Besant

Beef Stew (Basic Recipe)

6 - 8 servings

The Joy of Cooking introduces this recipe by saying that you can alter the vegetables and proportions.  For a fresher flavour, add more vegetables or herbs toward the end of cooking.

Pat dry:
2 pounds boneless stewing beef, such as chuck, short-rib meat or bottom round, cut into 2 inch cubes.  Or go to the store and buy stewing beef!  Already cut up and ready to throw in the pot!

Season the meet with:
1/2 to 1 teaspoon dried herbs (thyme, marjoram, savory, oregano, and/or basil)  (I used Italian seasoning)
1/2 teaspoon salt
1/2 teaspoon ground black pepper

Dredge the meat with:
1/2 cup all purpose flour

Shake off any excess flour.  Heat over medium-high heat:
2 Tablespoons olive or vegetable oil, bacon fat, beef drippings, or other fat

Add the meat in batches and brown on all sides, being careful not to crowd the pan or scorch the meat.  Remove with a slotted spoon.  Pour off all but 2 tablespoons of fat from the pan (add more if needed.)  Add:

1/2 cup chopped onion
1/4 cup chopped carrots
1/4 cup chopped celery
1/4 cup chopped leeks (optional)
2 tablespoons chopped garlic (optional)

Cover and cook, stirring often, over medium heat until the onions are softened, about 5 minutes.  Add:
2 bay leaves
1/2 to 1 teaspoon of the same herbs used to season the meat
1/2 teaspoon salt
1/2 teaspoon ground black pepper

Add enough to cover the meat at least halfway:
2 to 3 cups beef or chicken stock, dry red or white win, or beer.

Bring to a boil.  Reduce the heat, cover, and simmer over low heat until the meat is fork-tender, 1 1/2 to 2 hours.  Add:
2 to 3 carrots, peeled and cut into 1-inch chunks
3 or 4 boiling potatoes, peeled and cut into 1-inch chunks
2 turnips, peeled and cut into 1-inch chunks
2 parsnips, peeled and cut into 1-inch chunks

Cover and cook until the vegetables are tender, 35 to 40 minutes.  Remove the pan from the heat and skim off any fat from the surface.  Taste and adjust the seasonings.


Sunday, August 17, 2014

Blueberry Breakfast and Breezy Beaches

Alan and I just spent a lovely weekend with our visitors from Jedburgh!  We had not been able to get together since last September but it was just like we had seen each other last week. Although the weather here was not great, we managed to enjoy the Ayrshire shore and scenery!

Last night we had a lovely dinner overlooking Ayr Beach at Ayr India.  We had hoped for better views, but the atmospheric conditions were interesting enough for us, and the food was magnificent, as always!

We were so busy getting the house ready for the first overnight visitors we have had in ages, that I didn't have the chance to bake anything for their arrival.  So early Sunday morning, I decided to find something suitable for breakfast baking!

In my searches on the internet, I found so many delicious sounding recipes, many too sweet and also too involved for me to get done fast enough.  But one that caught my fancy was a  Buttermilk Blueberry Breakfast Cake from a blog called Alexandra's Kitchen!  This sounded quick and easy and just what I was looking for!  With only one problem, I didn't have any buttermilk!

Although there are instructions on how to convert milk into buttermilk, I have never really wanted to try that.  But I did have Creme Fraiche in the fridge and decided to use that as a substitute.  No pressure, with guests in the house and having no idea how it would turn out.......but it was absolutely delicious.  (I did add another heaping tablespoon to the mix because it did seem too dry with the measurement that was suggested, glad I did too.)


Following our breakfast of scrambled eggs, bacon and this blueberry cake, we all had a lovely Sunday drive along the coast to Largs!  Since it is still August, this should have been a much nicer day than we got.  But the wind was gusting and the waves were all churned up and it was cold enough for a scarf and layers!  However, we had a fabulous day!


After walking along the shore, looking at the Millport ferry going back and forth and discovering Ibac and how much I missed it being in Ayr.....we did what you are supposed to do when visiting Largs - had ice cream at Nardini's!


As often as I have to go to Largs, mainly to work, I have only sat down to eat there 3 - 4 times, and have never just sat down for ice cream only!  (There is another section where you can just get cones to walk along the usually beautiful beach!)  So I can also say their food is excellent. But on this particular occasion, we enjoyed gorgeous sundaes and then coffee before heading back to our home.  Once there, our friends had to begin their journey back to Jedburgh.  But we will certainly not go so long between visits again, I hope!


Being in a hurry, I was not able to convert any measurements, but I did have to refer to the online butter conversion to be able to get the correct quantities.

Buttermilk Blueberry Breakfast Cake -

Ingredients:


1/2 cup unsalted butter, room temperature
2 tsp. lemon zest or more - zest from large lemon (I didn't have this and didn't miss it)
7/8 cup  1 Tbs to sprinkle on cake before baking
1 egg, room temperature
1 tsp vanilla
2 cups flour (set aside 1/4 cup of this to toss with blueberries)
2 tsp baking powder
1 tsp kosher salt
2 cups fresh blueberries (I used frozen and that worked out fine)
1/2 cup buttermilk or creme fraiche worked for me!

The instructions from Alexandra's Kitchen explain how to make homemade buttermilk as follows:
Place 1 Tbs vinegar or lemon juice in a liquid measuring cup.  Fill cup with milk until it reaches the 1 cup line.  Let stand for five minutes.  Use only 1/2 cup of the prepared mixture for the recipe.  (so if I had to make this substitute - I would make 2 cakes!)

Instructions:

1.  Preheat oven to 350F or 160C.  Cream butter with lemon zest and 7/8 cup sugar until light and fluffy.

2.  Add the egg and vanilla and beat until combined.  Meanwhile, toss the blueberries with 1/4 cup of flour, then whisk remaining flour, baking powder and salt.

3.  Add the flour mixture to the batter a little at a time, alternating with the buttermilk.  Fold in the blueberries.

4.  Grease a 9 inch-square baking pan with butter or coat with non-stick spray.  Spread batter into pan.  Sprinkle batter with remaining Tbs of sugar.  Bake for 35 - 45 minutes.  (35 was good for my cake)  Check with a toothpick for doneness.  If necessary, return pan to oven for a couple of more minutes.  Let cool at least 15 minutes before serving.

Since my husband is not crazy about blueberries, I was delighted to see this exact recipe can also be used with cranberries. There were a few changes:  orange zest instead of lemon zest.   1 cup of sugar instead of 7/8, and a suggestion that you can make the batter the night before and store it in the fridge!  Alexandra's Kitchen goes on to say not to store the batter in the pan you plan to bake it in but to store it in a tupperware container of some sort, then transfer to the greased pan in the morning when you want to bake it.


"Friendship is unnecessary, like philosophy, like art.... It has no survival value; rather it is one of those things that give value to survival." ~C.S. Lewis